![]()
Ventrilo - Voice Setup Training
Configuring system wide mixer input source fader controls
This section should be read if you are not using the built-in Mixer option in the Setup-Voice window. If you are using the built-in mixer then click here to jump to the Training Sensitivity section.
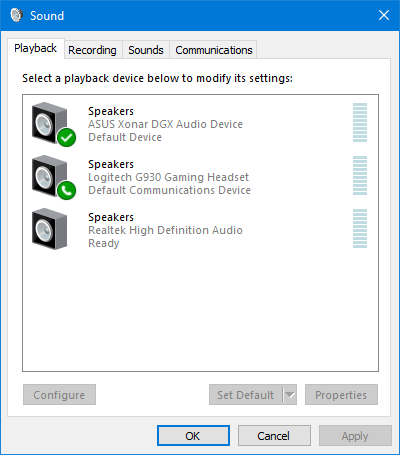
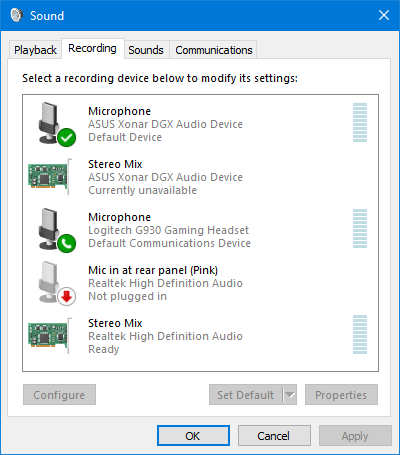
Before using Ventrilo you must first configure your system to enable the proper audio source for voice communication. This is done by using the Playback / Recording tabs in the Windows > Control Panel > Sound . To access the appropriate control panel click the Ventrilo Setup and then click either the Playback or Recording buttons on the Voice tab.
Clicking the "Playback (Output)" button will open the Playback tab (Figure 1). It lists all of the different audio output devices. Right-click in the window and enable both "Show" options.
Clicking the "Recording (Input)" button will open the Recording tab (Figure 1). It lists all of the different audio input devices. Right-click in the window and enable both "Show" options.
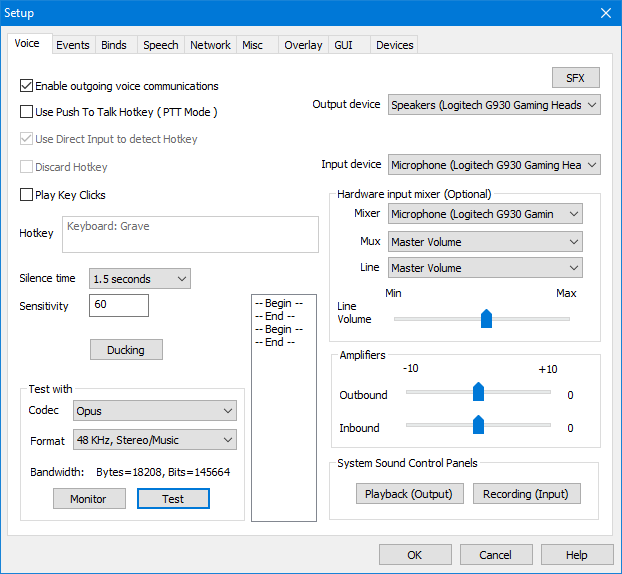
Figure 1
This is where we train Ventrilo's signal strength monitor (or Sensitivity) for voice activation. Unlike other Voice Comm programs that use an abstract slider control, Ventrilo uses a manually entered numerical value. The advantage to this is that the user can see exactly what numerical value causes voice input to trigger. Once you grasp what's being displayed you will then appreciate just how much better this mechanism is.
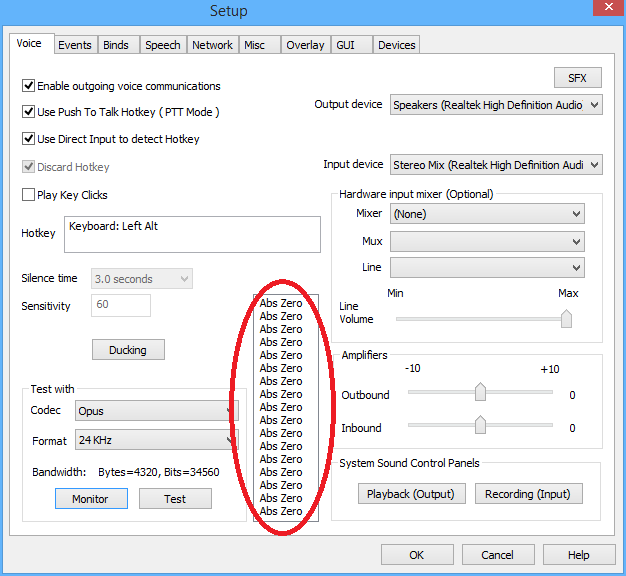
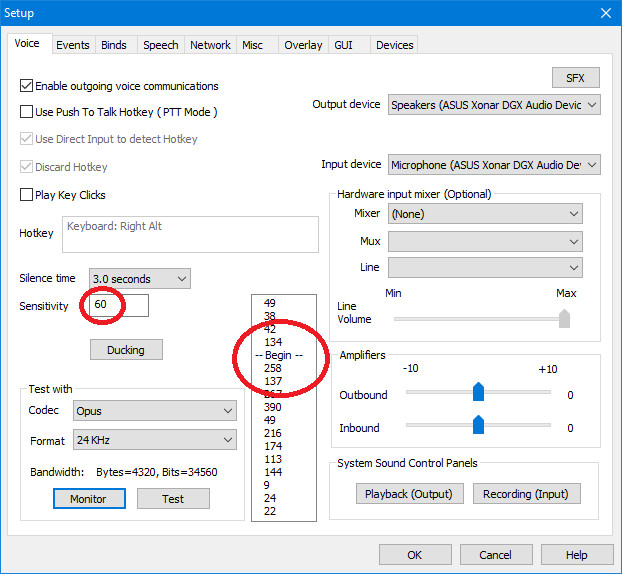
In Figure 2 there is an input box called "Sensitivity" that effects when the program Keys the Mic and how loud you sound when talking. This is where we enter a numerical value that tells Ventrilo at what point we want to "Begin" a voice stream. This number directly relates to the red circled numbers displayed in the list box. Basically what the number means is that when the circled numbers are greater or equal to the "Sensitivity" value then we are initiating a voice stream that we want all of the other people to hear. The higher the number the stronger the signal. When the picture in figure 5 was taken no one was speaking into the microphone. That's why the signal strength is hovering around the low numbers.
Press the "Monitor" button to start the sampling. If you have your Microphone plugged in then you should be able to see the numbers change as you talk. Don't be afraid to start and stop Monitor mode when trying to get a feel for the numbers scrolling by.
Figure 2
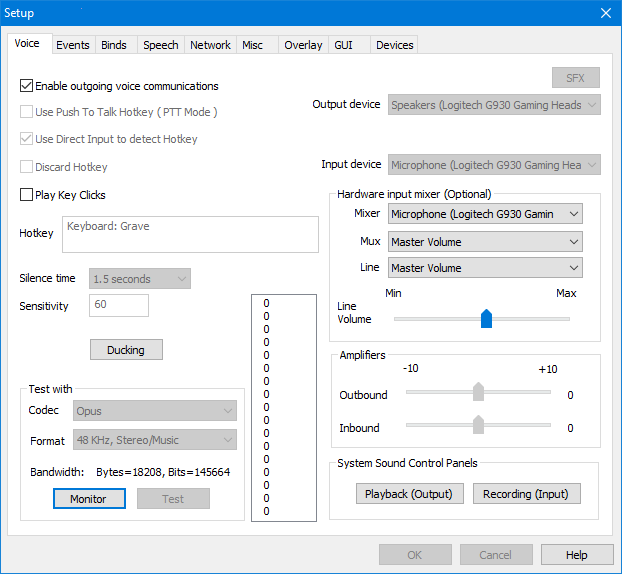
In Figure 3 you will see that all of the numbers are Abs Zero. If this happens then it's possible that your input source is not setup correctly. For example, if you have the "Line-In" in the Recording tab selected as the input source then you will not receive any signal at all. The Abs Zero means that the input signal is Absolute Zero (or nothing) versus an actual 0 in the signal list window which means there is a signal but it's so small it doesn't register.
It has been discovered that some sound input devices will produce an absolute zero signal strength even though they are functioning properly and will display real signal numbers as soon as you start talking into your microphone. Starting with version 3.0 the Abs Zero's will still be displayed but the warning has been removed. It's up to the user to decide if the Abs Zero's have any real meaning or just a pure 0 signal strength.
Figure 3
In Figure 4 you will see the "--Begin--" text circled in red. Notice the number before it. The number 134 is larger then the value entered in the Sensitivity input box. This means that voice communication will start and will continue transmitting until 3 seconds goes by with those same numbers all being below your Sensitivity value.
Basically it’s a matter of determining at what point do you want Ventrilo to start transmitting voice data. The numbers displayed in the tall list box show you the current signal strength from your microphone. The larger the number the stronger the signal. The sensitivity value relates to the signal strength.
In monitor mode you can get an idea of what numbers are being generated as you talk, type, heavy breathing and making no noise at all. In monitor mode you will want to do these things in order to determine at what point does the extraneous noise level top out at. This will be the bare minimum value you want to enter into the Sensitivity input box.
Now that you have ruled out the background noise lets do the same thing but we will actively talk while running the monitor. This is what Figure 4 actually shows. The Sensitivity indicator in the list box jumped to 134, which is larger then our sensitivity value of 60. Notice the numbers preceding the "Begin" and that they are all less then 60. When trying to figure out the talk Sensitivity you might try mumbling to your self in order to get a higher Sensitivity value that you would want to filter out just like the background noise.
In either event, the number that shows up in the list box is an example of the number you want to enter into the Sensitivity input box, or value around that range, ie: signal strength. The larger the number the stronger signal is required from the mic. Lower numbers will cause the input to pick-up sounds with less volume.
Note: When setting your sensitivity please keep in mind that wind from a fan or ventilation system can also create noise as it passes over the microphone. This includes headset mounted microphones as well has desk mounted boom microphones.
Figure 4
Now that we have worked out the Sensitivity value we test it to get a feel for how well it works.
Press the "Test" button and begin talking. When your voice level reaches the Sensitivity value it will display the "--Begin--" message in the list box. Ventrilo has also started to record everything you say. When you stop talking and stop making background noises for approximately 3 seconds the program will display the "--End--" message and then playback everything it recorded. This way you can get a feel for the Sensitivity and determine how other people will hear you. See Figure 5.
This playback feature is very useful for testing your settings without actually going into a live Ventrilo server. Just start the Test mode and startup the games you like to play or whatever work you plan on doing. Ventrilo will play back whatever it records. You can use this to fine tune your Sensitivity value as most people tend to make more extraneous background noise when playing a game or typing.
Note: There is a problem with some sound card drivers. Basically, the sound card will sometimes change the attenuation of the microphone input port without your permission. This has the effect of changing the signal strength coming from the microphone. This is not a Ventrilo problem and there is nothing that the program can do to compensate for this.
Additional: If you enable the mixer option in Ventrilo and run the program like you normally would then you can look in the log file and it will mention that the hardware volume is being changed by another program if you suspect such a problem exists.
Figure 5