![]()
Ventrilo - Main
User Name
Before you can use Ventrilo you must first create a user account. This account name will be used when you log in to any Ventrilo servers and will be the name displayed to all the other users connected to the same server. All other settings, i.e. servers - binds - setup info, is associated with a specific user account.
Server
A user can define any number of servers that they can connect to, but only one server would be active at any given time. This list box displays the human readable name that the user assigns to an IP or DNS address when defining a server.
Bindings
This option displays the list of key binding groups that the user has created. By default the program will display the (None) binding indicating that no key bindings are currently active.
Connect
This button will instruct the program to connect to the specified server in the Server pull down box. If auto-reconnect is enabled in the Setup-Network settings dialog, and a previously good connection to a server had already been established, then this button will display a countdown in seconds (along with the word Stop) of when the program will attempt to automatically reconnect to the server. If the program is counting down and you want to abort the auto reconnect simply click on this button again (now displaying the word Stop and the countdown seconds remaining).
Comment
Once you are connected to a server pressing this button will allow for entering a comment string that will be sent to all of the other users on the same server. This comment will be displayed next to your name in parenthesis. If you or any other users have the Text-to-speech feature enabled and have the sound events options for Comments set to TTS, then when you or someone else enters a comment it will be spoken in Text-to-speech form.
Double clicking another users name will pop up a window that will let you copy and paste the comment associated with that users name. This also applies to the server name at the top of the active users window.
Chat
This button will activate a chat window that is very similar to IRC (Internet Relay Chat). The chat window has a hide button which will hide the chat window from view and remove it from your task bar. However, it will remain active and continue to receive information. If the chat window is hidden then pressing the Chat button again will make it visible. When someone has an active chat window open you will see a "c" in front of their name.
Setup
This button will activate the setup options for the currently selected user.
Note: If you are connected to a server and have outgoing voice comm enabled, pressing this button will disable your microphone from communicating with the rest of the users. However, you will continue to receive and hear voice streams from the other users. The microphone will be enabled for normal use once you close setup dialog box.
About
The about button will display the Ventrilo Version number, Copyright, Author and URL information for the program. It also has buttons for going to the main Ventrilo.com web site and purchasing a registration. If you do purchase a registration key it will be emailed to you and you will need to enter the registration key here.
Close
The close button will disconnect the program from any active server and instruct the program to exit the system.
Help
The help button activates this help page.
Mute Sound
The mute sound check box will mute all sound being generated by the program. This includes incoming voice comm traffic, text-to-speech messages, wave file messages, comments and most other sound generating events. There are several events which intentionally ignore the mute sound setting. These include connecting and disconnecting from the server because the user would consider those notifications to be very important. There is a function in the key bindings setup dialog box that allows for toggling the mute sound feature. That function is referring to this check box.
Mute Microphone/Binds
The mute microphone check box will prevent your microphone from picking up any sound. The program will continue to monitor the microphone but it will not transmit any sounds that it picks up. There is a function in the key bindings setup dialog box that allows for toggling the mute microphone feature. That function refers to this check box.
When checked this option will also prevent any wave file binds or Text-to-speech binds from being sent out to the rest of the users.
Synchronous
This option forces all wave file messages and Text-to-speech messages to be played one at a time. If several people are playing wave files or TTS messages at the same time it can be very hard to understand them all or the sound level might be overbearing.
Key Forwarding
This option has no effect when a binding is selected that has the "DirectInput" option enabled.
When you activate a group of binds via the Binding pull down box the program intercepts those keys and prevents any other applications from using them. However, if you enable the Key Forwarding option Ventrilo will try to forward the intercepted keys on to what ever program happens to be in the foreground. In theory this is a nice feature as it will not prevent any other programs from using those keys. However, in practice it means that you potentially wind up flooding wave file and TTS messages to the other users connected to the same server as you. This feature works with most normal applications like word processors, browsers, command windows and the like, but it doesn't work with some games. Please be considerate of other users when turning this feature on.
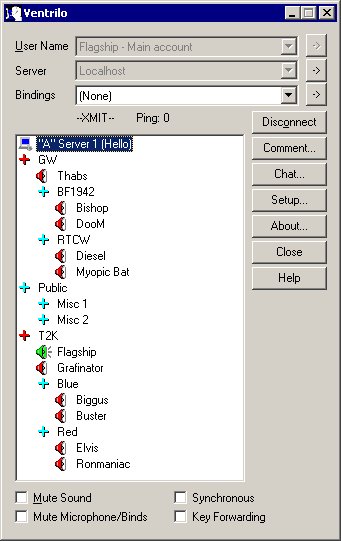
In Figure 1 you will see an example of what the program looks like when connected to a server.
The first entry in the active users window is always the name of the server and any comments that the administrator has assigned to it.
Notice that the little speaker icon next to Flagship's name is green. The speaker indicates that this item is user and the color green indicates that he is talking into his microphone and transmitting a voice stream.
The blue and red cross icon's indicates a public and private channels. If you double click on a channel name the server will move you into that channel and you will only hear sounds being generated by other users in the same channel. Likewise, the only people that will hear you are those that are in the same channel. In order to return to the lobby simply double click the server name. You can also bind keys to switch channels at any time. See the bindings setup page for more details on switching channels binds.
Double clicking on another users name will move you into the same channel they are in.
Figure 1 |
 |
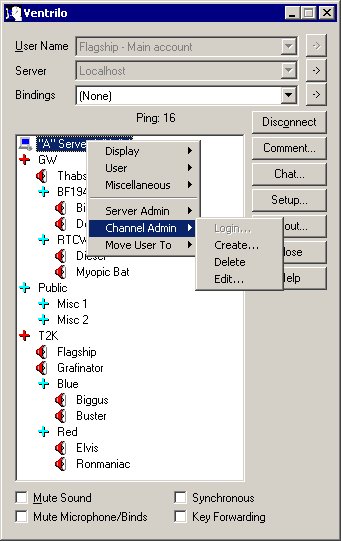
In Figure 2 you will see the pop up menu that is created when you right click in the active users window. The options above the divider line are meant for all users, while the options below the divider are meant for server and channel administrators.
Figure 2 |
 |
Display - Expand
When clicked on a channel it will expand that one channel to what is currently underneath it. It does not expand all sub-channels.
Display - Expand All
When clicked on a channel it will expand that one channel and all of it's nested sub-channels.
When clicked on the server or an open space it will expand all channels and their nested sub-channels.
Display - Collapse
When clicked on a channel it will collapse that single channel and all of it's sub-channels.
Display - Collapse All
Can be clicked anywhere and all channels and associated sub-channels will be collapsed.
User - Mute
Right clicking on a users name lets you enable or disable muting of that specific user. You will continue to receive the sound events generated by the user but Ventrilo will not play them. When a user is muted an "M" will appear in front of their name.
User - Copy comment
When clicked on a user name it will copy the users current comment to the system clipboard.
This is different from version 1.x where double clicking on a user name would popup a dialog box which could be used for copying the users comment to the clipboard.
Miscellaneous - View log file
This option will start the notepad program and will display the ventrilo log file. Note: The information does not update as new log events occur.
Miscellaneous - Copy channel path
When clicked on a channel name the program will copy the correct syntax for making reference to the given channel. This is important when clicking on sub channels as the formatting will look like the following:
Channel/Sub-channel/another-sub-channel
Miscellaneous - Clear channel passwords
This option will erase all channel passwords that have been remembered for the current server.
Server Admin - Login / Logout
This option will open a window in which you can enter the administrator password for the server. If the server accepts the password the "A" indicator will show up on the server name at the top of the list indicating that you are now a server administrator. If the server rejects the password then a popup message will be displayed.
If you currently logged in as a server admin then this option will be displayed as "Logout" and can be used for removing server admin rights for your current connection.
Server Admin - Kick
Right clicking on a user and choosing the kick option will open a window where you can enter a reason for kicking the user off of the server. If you then press the OK button it will send the request to the server which will then disconnect that user. This information is logged by the server and includes details like: The user who was kicked, who kicked them, the reason why if one is provided.
Server Admin - Ban
The ban option is similar to the kick option except that the users IP address will be recorded in a ban file for future reference if the server is restarted. Once in the ban list that IP address will not be allowed to connect to the server.
Channel Admin - Login / Logout
Version 2.0.0 of Ventrilo introduces the concept of password protected channels and sub-channels. It also has the ability to assign what's called an Admin password to a specific channel. An admin password can be assigned to any channel, but normal use would be to assign a channel admin password to each of the root channels and then give the admin password to a specific person who accepts responsibility for that specific channel and it's associated sub-channels. Note: Only server admin's can assign channel admin passwords to root level channels, but a channel admin can assign additional admin passwords to any of his sub-channels.
When clicked on a channel a dialog box will open where you can enter the channel admin password for the selected channel. If the server accepts your password then an "A" will appear next to that channel indicating that you now have channel admin rights for it and all of it's sub-channels. If one of it's sub-channels has another admin password then you will still have access rights over it i.e. higher level admin's always have access rights to lower level admin's, but lower level admin's don't have access rights above their current channel.
If you already have admin rights to the channel then selecting this option will remove your admin rights for the current connection.
Channel Admin - Create
When clicked on the server item in the user list window the program will create a root channel. Although, only server admin's can create root channels.
When clicked on a channel the program will create a sub-channel in side of it. Server admin's can do this by default in any channel and channel admin's can do this for any channel for which they have logged in with the selected channels admin password.
The option will open a new dialog box where you can enter the new channels Display name, phonetic pronunciation name, channel password and the admin password. If you do not give it a channel password then the channel is available to anyone unless one of it's parent channels has a password on it. Sub-channels of a password protected channel inherit the password of it's parent until it reach's the lobby. Thus, if no parent channel's have passwords then the new channel will be available to everyone.
Channel Admin - Delete
When clicked on a channel it will delete the selected channel and all of it's sub-channels if any exist. Any users in the selected channel or sub-channels will be automatically moved to the next highest channel or to the lobby as a last resort.
Channel Admin - Edit
When clicked on a channel it will allow you to selectively change specific portions of a channels details. All changes take effect immediately and all clients are informed about the changes.
Move User To
Right clicking on a user and then selecting this menu option will move that user into any of the available channels or back out to the lobby. Very useful for moving people around on game servers if they don't have keys bound to manually move them selves to a different channel.