![]()
Ventrilo - Main
Select the section of the main window you would like help for:
Pulldown windows and their associated edit buttons
View
User
Miscellaneous
Change State
Display
Integration
Themes
Appearance
Pulldown windows and their associated edit buttons:
User Name button
Before you can use Ventrilo you must first create a User login name. This name will be used when you login to any Ventrilo server and will be the name displayed to all the other Users connected to the same server. All other settings, i.e. servers - binds - setup info, are associated with a specific User name.
Name Selection
This list box displays all the User names that have been entered.
Server button
This button allows the selected User to define any number of servers that they can connect to, but only one server per Main Window will be active at any given time.
Server Selection
This list box displays all the servers that have been entered for the selected User name. The name is for display purposes only. Note: Main window size/location is now saved for the selected server name.
Bindings button
This button allows you to create/edit the bind keys that will be assigned to the selected User name.
Bindings Selection
This list box displays the list of key binding groups that the User has created. By default the program will display the (None) binding indicating that no key bindings are currently active.
Connect / Disconnect
This button will instruct the program to connect to the specified server in the Server list box. If auto-reconnect is enabled in the Setup-Network settings dialog, and a previously good connection to a server had already been established, then this button will display a countdown in seconds (along with the word Stop) of when the program will attempt to automatically reconnect to the server. If the program is counting down and you want to abort the auto reconnect simply click on this button again (now displaying the word Stop and the countdown seconds remaining). When connected to a server this button changes to the Disconnect option.
Comment
Once you are connected to a server pressing this button will allow entering a comment string that will be displayed in parentheses to all Users on the same server. If you or any other Users have the Text-To-Speech feature enabled and have the sound events options for Comments set to TTS, then when you or someone else enters a comment it will be spoken in Text-To-Speech form.
Chat
This button will activate the Global Chat window. The global chat window has a hide button which will hide the chat window from view and remove it from your task bar. However, it will remain active and continue to receive information. If the chat window is hidden then pressing the Chat button again will make it visible. When someone has an active chat window open you will see a "C" in front of their name.
Setup
This button will activate the setup options for the currently selected User.
Note: If you are connected to a server and have outgoing voice comm enabled, pressing this button will disable your microphone from communicating with the rest of the Users. However, you will continue to receive and hear voice streams from other Users. The microphone will be enabled for normal use once you close setup dialog box.
About
The About button will display the Ventrilo Version number, Operating System build, Copyright, Author and URL information for the program. It also contains buttons for quick access to the main Ventrilo.com web site.
Quit
The Quit button will disconnect the program from any active server and instruct the program to exit.
Help
The help button activates this help page.
Enable / Disable extended mode
This option will toggle between Extended Mode and Default mode. Default mode displays the eight icon buttons when installed for the first time. Extended mode removes the User-Server-Bindings info from the top of the display and moves the XMIT- PING-Icon indicators to the top of the window to maximize the window space vertically.
Mute Snd (Mute Sound)
The mute sound check box/icon will mute all sound being generated by the program. This includes incoming voice comm traffic, text-to-speech messages, wave file messages, comments and most other sound generating events. There are several events which intentionally ignore the mute sound setting. These include connecting and disconnecting from the server because the User would consider those notifications to be very important. There is a function in the key bindings setup dialog box that allows for toggling the mute features.
Mute Mic (Mute Microphone / Binds)
The mute microphone check box/icon will prevent the microphone from transmitting any sound when selected. The program will continue to monitor the microphone but it will not transmit any sounds that it picks up. There is a function in the key bindings setup dialog box that allows for toggling the mute features.
When checked/selected, this option will also prevent any wave file binds or Text-to-speech binds from being sent out to the rest of the Users.
MSG (Pending Messages) Icon
This icon will flash when messages, or file transfers, are received from other Users. Click the icon to open the Pending Messages window.
PTT (Push To Talk) icon
This icon is a secondary Push-to-Talk option in conjunction with the main Push-to-Talk key.
Menu Icon (optional)
Left-clicking this icon, when enabled, will perform the same function as a right-click in the main window. Press and hold the Mute Bar menu button for half a second to automatically open a new SCP window. Enable this option in the Setup > GUI tab.
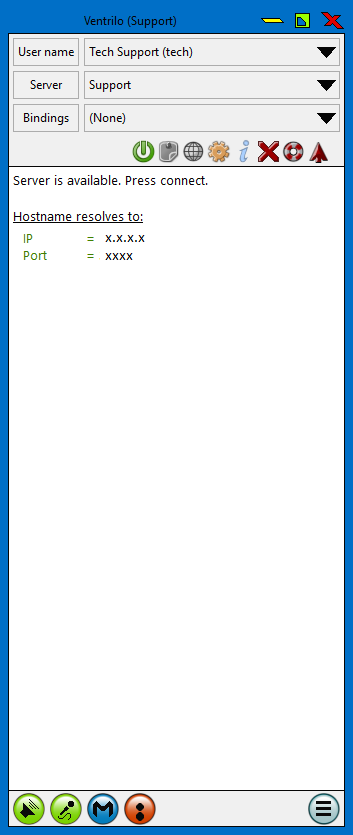
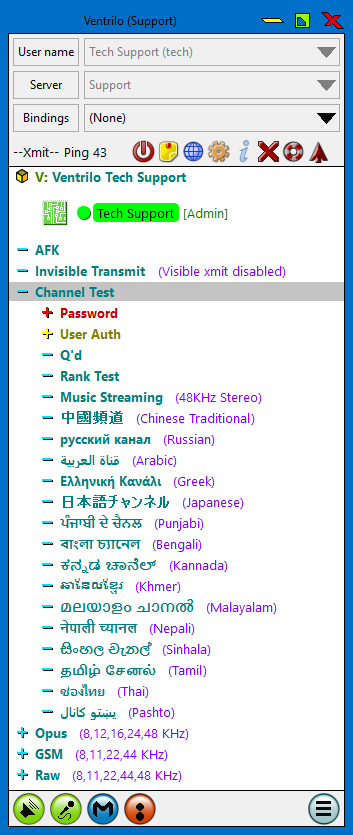
Figure 1 displays an example of what the program looks like before and after connecting to a server. (Note: the following items may vary depending on Theme displayed)
The first entry in the active Users window is always the name of the server and any comments that the administrator has assigned to it.
The "dot" icon indicates that an item is a User and the color green indicates that User is transmitting.
The blue, red, and yellow "+/-" icons indicate public, private, and authorization required channels respectively. If you double-click on a channel name the server will move you into that channel and you will only hear sounds being generated by other Users in the same channel. Likewise, the only Users that will hear you are those that are in the same channel. In order to return to the lobby simply double click the server name. You can also bind keys to switch channels at any time. See the bindings setup page for more details on switching channels binds.
Double-clicking on another User's name will move you into the same channel they are in.
Figure 1
The client uses standard drag-n-drop techniques.
Server Admins can select any User and drag them to any channel or back out to the lobby. This also means that you can drag them to a password protected channel so that you can communicate with them without giving them the password.
Channel Admins can select any User that resides within a channel for which they have channel admin rights and move them to any other channel for which they have admin rights. This includes all sub-channels. For example, you might have a channel that has two sub-channels but you have admin rights to the root channel. The two sub-channels might be password protected as well. If the User manually joins the root level channel then you, as the Channel Admin, could then drag them into any of the sub-channels, including the password protected channels, thus allowing the User to communicate with others in the passworded channels but without giving the User the channel password. Note: Channel Admins can move Users out to the lobby but they cannot drag a User from the lobby into a channel. Only a Server Admin can do that.
The Server Properties has an option to select how the channels are ordered. If the option is set to "Manual" then a server admin or channel admin can drag a channel up and down and drop it on a parallel channel to change the display order of the channels. If a Server Admin selects a root channel that contains sub-channels and Users within those channels then all sub-channels and Users will be moved as well.
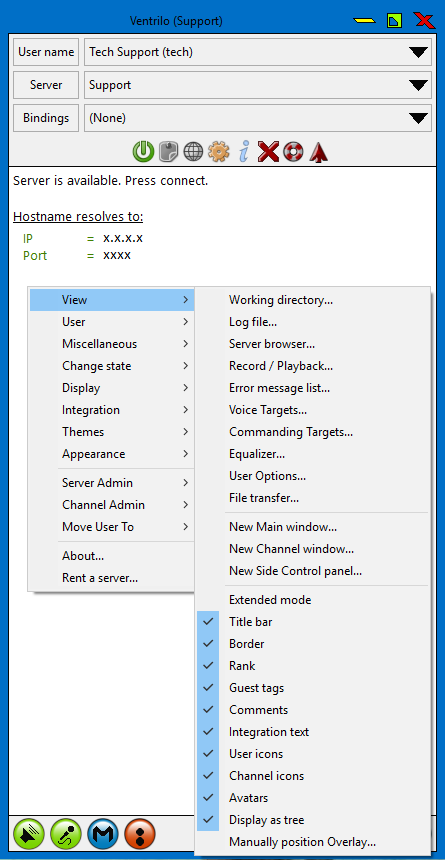
Figure 2 displays the pop-up menu (left-side) that is displayed when you right-click in either the main/channel window or click the Menu button. The options above the divider line are meant for all Users, while the options below the divider are for Server and Channel Administrators.
The menus are context sensitive and some options will be grayed-out depending on what you have selected, be it the server name, a channel name, a User name or possibly outside of the User list window entirely.
Figure 2
Working directory
This option will open a new Operating System "File Explorer" window and will display the contents of the working directory for the currently selected User Name. This is a very easy and convenient way to locate the directories for wave files binds, stream recording files, chat logs, the Icon override directory and other items that pertain to the configuration of the program.
Log file
This option will display the current entries in the program log file. Please note that each entry in the log file is time stamped and that you will need to scroll to the end of the log file in order to find the most recent event warnings or errors.
Server browser
This option will open the built-in server browser window and display the status of all the servers configured for the current User Name. If the window is already open but is obscured by other windows you can select this option again to bring it to the foreground.
Record / Playback
This option will open the record-playback window which is used for recording voice conversations and playing back recordings of prior conversations. If the window is already open but is obscured by other windows you can select this option again to bring it to the foreground.
Error message list
This option will open the applications Error message list window. It will contain a running list of errors that have been generated since you started the program or cleared any outstanding items.
Voice Targets
This option will open the Voice Targets window.
Commanding Targets
This option will open the Commanding Targets window.
Equalizer
This option will open the Outbound Equalizer window. This is very useful when you are streaming music and would like to tailor the sound depending on the source material or to help offset sound loss caused by codecs. The window does not need to remain open to be active.
User Options
This option will open a window with selections that are used to mute, kick, ban and select image files for the currently selected User in the main window. Clicking on a different User in the main window will change what is being edited in the User Options window.
File transfer
This option will open the File Transfer window that allows you to send and receive files from other Users. Files can be sent to other Users whether they are online or not. File options include "Delete after all recipients have downloaded", "save the file in server Memory" (instead of on the server harddrive), and "mark the file as Private".
New Main window
This option will open a new Main Window which allows you to select another User Name and/or server connection.
New Channel window
This option will open a breakout Channel Window which only displays the activity for the channel. Drag-drop the channel name to the window to view. Selecting the Server name will prompt for the entire Server or Lobby (only).
New Side Control panel (SCP)
This option will display click-buttons on either side of the main window. The buttons are the same as the options when using 'right-click' in the main window. Multiple SCP buttons can be displayed at the same time. Right-click on each panel to select the required view and the options to close-move the SCP. Place the mouse cursor over the button to display the tool-tip. Option settings for the SCP can be found in Setup > GUI tab > Side control panels section.
Extended mode
This option will toggle between Extended Mode and Default mode. Default mode displays the User-Server-Bindings information when installed for the first time. Extended mode removes the User-Server-Bindings information from the top of the display and moves the XMIT- PING-Icon indicators to the top of the window to maximize the window space vertically.
Title bar
This option will toggle the Title bar on-off. When the Title bar is turned off it extends the vertical space of the window. Please note that you can still move the window around the screen while the title bar is turned off by left-clicking in any open space of the window that doesn't have any purpose. Clicking in the XMIT / PING area is the best place to grab the window in order to reposition it.
Border
This option will toggle the window sizing border on-off. Turning off the sizing border will prevent you from resizing the window and will give the program window a "flat" look and feel, as if the window was part of some other application. (Note: You can still move the window around but you cannot resize it)
Rank
This option will toggle on-off the display of individual Users rank abbreviations.
Guest tags
This option will toggle on-off the display of the "Guest" tag for the Users that are not registered on the server.
Comments
This option will toggle on-off the display of comments next to the User name.
Integration text
This option will toggle on-off the display of media Integration messages next to the User name. This can be info such as track number, song title, artist, media player, etc.
User icons
This option will toggle on-off the display of the User icon (default dot icon) which indicates the transmit status. This icon will vary depending on the theme that is loaded.
Channel icons
This option will toggle on-off the display of the icons located at the beginning of each channel name.
Avatars
This option toggle on-off the display of the User avatars.
Display as tree
This option will toggle on-off the display of all channels in either tree-mode or single-column left-justified.
Manually position Overlay...
This option will allow you to manually reposition the location of the Video Overlay using your mouse. Once in this mode click the left mouse button to finalize the new location.
Mute
Right-clicking on a User name lets you enable or disable muting of that specific User. You will continue to receive the sound events generated by the User but Ventrilo will not play them. When a User is muted an "M" will appear in front of their name.
Send Page
When a User name is selected it will send a "Page" to the selected User. This will produce a TTS message on the target's computer to say "Page from X" where X is the name of the person sending the page.
If the target User has paging turned off or is in a channel that has paging disabled an error message will popup telling you that the selected User can not be paged.
Private Chat
Right-clicking on a User name will let you open a private chat session window with that User as long as your account has access rights to do so. You will be able to have a private text or voice chat with the selected User.
Deferred message
This option allows messages to be sent to other Users if they are offline. They will be notified of pending messages when they next login.
Lodge complaint about
Right-clicking on a User name will open a new window where you can enter a complaint about the User. The complaint will only be visible by those Users who have been given access rights to receive complaints. This option is available only if you have been given access rights to send complaint messages.
Special effects
This option will open the Special Effects setup window which allows you to apply special sound effects such as reverb or echo to the selected item in the User list window. You can also perform more advanced tasks such as adjusting the volume for the item or applying 3D surround sound directional properties to the item to create a more immersive and vibrant communication experience.
Special effects are unique and persistent to the item you selected when this option is activated. This applies to Users, channels and the server name. You can also apply global special effects to the User Name account by clicking the SFX button in the Setup-Voice window.
Add / Remove phantom
This option will either add a phantom User to the selected channel or remove an existing phantom. Phantoms allow you to listen in on other channels while you are currently in a different channel. A phantom User will show up with your login name but a "P" will be in front of it denoting it as a phantom to you and all the other Users connected to the server. Phantoms are persistent and will be restored when you reconnect to the same server. Note: Each phantom will consume a connection slot on the server.
Copy channel path
When selecting a channel name the program will copy the correct syntax for making reference to the given channel. This is important when clicking on sub channels as the formatting will look like the following:
Channel/Sub-channel/sub-sub-channel
Clear channel passwords
This option will erase all channel passwords that have been remembered for the current server.
Copy comment
This option will copy the User's current comment to the system clipboard.
Copy comment URL
When right-clicking on a User name it will copy the URL portion of the User's comment (shown as an underlined link) to the system clipboard. Hover the cursor over the underlined text to display the URL. Control-click to send the URL to the default browser.
Accept pages
Allows you to dynamically toggle the option of accepting pages vs. your default setting as specified in the connection editor for the current server.
Accept User-to-User communications
Allows you to dynamically toggle whether or not another User can transmit directly to you using the User-To-User transmit mode. The default for this option is specified in your connection editor for each server.
Accept Private Chat sessions
Allows you to dynamically toggle whether or not another User can initiate a private chat session with you. The default for this option is specified in your connection editor for each server.
Allow others to record my conversation
This option will allow-disallow other Users to record your conversation. The default for this option is specified in your connection editor for each server.
Expand
When clicked on a channel, it will expand that one channel to what is currently underneath it. It does not expand all sub-channels.
Expand All
When clicked on a channel, it will expand that one channel and all of it's nested sub-channels.
When clicked on the server, or an open space it will expand all channels and their nested sub-channels.
Collapse
When clicked on a channel, it will collapse that single channel and all of it's sub-channels.
Collapse All
Can be clicked anywhere and all channels and associated sub-channels will be collapsed.
This feature enables-disables integration with one of the selected media player programs listed in the menu. The players currently supported are as follows:
iTunes
WinAmp
Windows Media Player
Spotify (currently Mac only)When enabled the Ventrilo client will periodically poll the specified application for details about what is currently playing: song, artist, track, etc. This information will be displayed in quotes after the transmitting User's name and/or comment..
Only one application can be selected at any given time. Please note that this feature does not transmit the sound from your media player program. It only intercepts the details about the song. If you want to broadcast the sound as well then you will need a sound card that supports line input options like "What you hear" or "Stereo Mix". Please refer to the Ventrilo.com website for further details in setup up a DJ style broadcast.
Caution: Interaction between the Ventrilo client and media player can be a little unusual at times. See the following caveats:
Windows Media Player
You should always start your WMP program before you enable this integration option. Otherwise, it may get confused about who is actually the owner.
If you close your WMP program then you will also need to deselect this integration option for the music from your player to actually stop and close. Otherwise, the WMP components will remain in the background and continue playing because another application is attached to it.
iTunes
Similar to the Windows Media Player problems, but in this case you should deselect this integration option before you close the iTunes main window. If you try to close the iTunes main window first it will wait about 10 seconds before it responds to your close window request and will complain about another application being attached to its scripting interface.
Themes
This will display a list of themes that have been saved to your local system and can be selected to change the look-feel of the current window. Each Main Window can have a different theme activated. Channel Windows will be displayed according to their Main Window theme. Additional themes can be downloaded by selecting the first option in the list - "Download more themes ..." - which will direct the server browser to www.ventrilo.com/themes.
There are times when you might have too many themes in your “Themes” folder. This may make it inconvenient when switching between themes using the Right-Click > Themes menu option, especially if that list is vertically longer than your monitor will display. In order to bypass this you can open the themes folder using the "Working Directory" option and then drag a VTP or Folder into the main window or one of its channels windows. The main window will automatically restart just as if you had selected a theme from the popup menu.
NOTE: Re-sizing the main window on some themes will reveal an additional special effect. Some themes may require an increase in the font size or setting the font to "bold" mode.
Appearance
Some themes can have multiple Appearances, or sub-themes. For example, the main theme is named "City Scape" and the Appearance, or sub-themes, are of different cities from around the world where each one changes the look of the main window.
Login
This option will open a window in which you can enter the Administrator password for the server. If the server accepts the password the "V" indicator will be displayed next to the server name at the top of the list indicating that you are now a Server Administrator. If the server rejects the password then a popup message will be displayed.
If you are currently logged in as a Server Admin then this option will be displayed as "Logout" and can be used for removing server admin rights for your current connection.
Logging in as Server Admin with this option does not give you full server admin rights. You will need to create a unique login account, assign it Server Admin and any other admin rights you think it should have to take full advantage of the more advanced admin features.
Each time you provide an invalid server admin password you will be kicked from the server. You will be allowed 3 tries before the server adds you to a timed ban list. After each 3 attempts the amount of time you are banned will be increased. All attempts at using the server admin password are logged.
Ban list
This option will open a new window which will display a list of currently banned Users from the entire server. It will also allow you to add new bans and delete existing ones.
MOTD (Message of the Day)
This option can be selected by anyone with an account on this server. If you are not a Server Admin it will display the last known "Message of the Day" when you connected to the server, in case you need to see it again but don't want to disconnect and then reconnect.
If you are logged in as a Server Admin it will allow you to edit the Message of the Day and send it back to the server so that when a client connects it will display the new message.
Guest MOTD
Similar to the regular MOTD menu option but it will display or edit the Guest version of the MOTD instead.
The Guest MOTD is only sent to those Users who do not have a registered account on the server. It is always displayed at login as well, unlike the regular MOTD which is only displayed if it changes or if the Server Properties is configured to always display it.
User Editor
This will open the User Editor window that allows you to create, edit and delete login account names. The USR file is where account names and access rights are stored. If you are not a Server Admin and do not have the "Add Users" right then you will see your own access rights when you select this menu option.
RCon (Remote CONsole)
This option will open the dedicated Remote Console window for issuing text commands to the server. Type "help" in the input box to display the list of commands.
Server Properties
This option will open the Server Properties window which is used for modifying the persistent configuration options that define how the server should function.
Complaint list
This option will open the complaint list window if you are allowed to receive complaint messages.
Rank list
This option will open the Rank list window. If you are a Server Admin it will allow you to edit the ranks, otherwise it will only display all of the currently available ranks.
Kick
Right-clicking on a User and selecting the kick option will open a window where you can enter a reason for kicking the User off of the server. If you then press the OK button it will send the request to the server which will then disconnect that User. This information is logged by the server and includes details including: The User who was kicked, who kicked them, the reason why if one is provided.
Kick all Guests
Similar to the Kick menu option, but instead of being performed on the selected User, it will kick all clients that are currently logged in with the Guest account. This is denoted by their comments always starting with the word GUEST:
Ban
The ban option is similar to the kick option except that the User's IP address will be recorded in a ban file for future reference if the server is restarted. Once in the ban list that IP address will not be allowed to connect to the server.
Globally Mute
Globally mute or un-mute the selected User. When globally muted a User will have a "G" next to their name and they will not be able to transmit any voice, TTS binds, Wave file binds, change their comment or send any chat messages. This can be useful for when you don't need to kick the User off of the server but don't want them to interrupt anything else.
Create
Right-clicking on the server name will create a root level channel. Only Server Admins can create root channels.
Right-clicking on a channel name will create a sub-channel beneath it. Server Admins can do this by default in any channel and Channel Admins can do this for any channel for which they have been given admin rights.
The option will open a new dialog box where you can enter the new channels Display name, phonetic pronunciation name, channel password and more. If you do not give it a channel password then the channel is available to anyone unless one of the parent channels has an assigned password. Sub-channels of a password protected channel inherit the password of the parent until it reaches the lobby. Thus, if no parent channels have passwords then the new channel will be available to everyone.
Delete
Right-clicking on a channel name will delete the selected channel and all of the sub-channels, if any exist. Any Users in the selected channel or sub-channels will be automatically moved to the Lobby.
Edit
Right-clicking on a channel name will allow you to selectively change specific portions of a channels details. All changes take effect immediately and all clients are informed about the changes.
Info
Right-clicking on a channel name will display the current configuration settings for the selected channel, but you will not be able to make changes. This option can be selected by anyone even though it appears in the Channel Admin sub-menu.
Ban list
Right-clicking on a channel name will display the current list of IP addresses that have been banned from the root level channel. Only root level Channel Admins can view or edit channel ban lists.
Kick
Right-clicking on a User name will move that User to the Lobby but you must have Channel Admin rights for the channel the selected User is in.
Ban add
Right-clicking on a User name will open a new window asking for the reason to ban the User, at which point the User's IP address will be added to the channel ban list. It will also kick the User out to the Lobby. You must have Channel Admin rights for the channel the selected User is in.
Note: This option is only available to a root level Channel Admin. If you are a sub-channel admin then you will not be able to use this feature.
Mute
Right-clicking on a User name will either mute or un-mute the selected User while they are in their current channel. Useful for when a channel is configured for "Muted" mode and a Channel Admin wants to un-mute them so that they can talk. Can also be used to silence annoying Users while they are in a normal channel.
If a User is channel muted an "N" will appear next their name.
Right-clicking on a User name will allow you to move the User to a different channel.
It will only display those channels that you have admin rights to and only if you have admin rights to the channel the User is currently in. If you have Server Admin rights then it will display all channels.
Drag-drop can also be used to move Users. The list will auto scroll up and down if you move past the top or bottom of the window.
When connected to a server some of the items in the User list window will have special status indicators in front of their names and surrounded by double quotes. The following is a list of what each of those status codes mean.
V
When displayed in front of the Server name it means you have Server Admin rights.
A
When displayed in front of a channel it means you have Admin rights for the specified channel and all of its sub-channels.
C
The User has opened the global chat window.
N
The User is channel muted. The state might change depending on how the channel is configured.
G
The User is globally muted and will not be heard by anyone on the server.
M
The User is locally muted by you only.
T
The User has sent a Text-To-Speech (TTS) bind message and it is currently playing. When the message is complete the indicator will be removed.
W
The User has sent a Wave file bind message and it is currently playing. When the wave file completes the indicator will be removed.
S
A Special Effect has been applied to the specified item. This can be on a server, a channel or individual Users.
P
The User is a Phantom of a User that has the same name.
The Ventrilo client has built-in support for special hardware devices such as keyboards and headphones that provide non-standard features. The following links will direct you to Ventrilo specific help and features for the listed items.
Keyboards:
Logitech G15 - Monochrome (Gamepanel and programmable keys)
Also applies to G13 keypad and Z-10 speakers.
Logitech G19 - Color (Gamepanel and programmable keys)
Headsets:
Logitech G35 / G930 (programmable buttons)
Overlay: